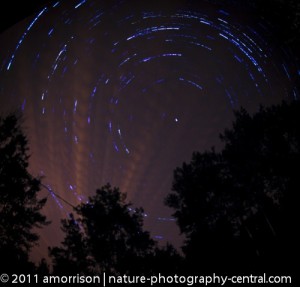
I’ve been talking about the summer night sky a lot, and planning planning planning…Finally I got my act together and did a night shoot this week.
The objective was to capture star trails. The invisible paths the stars make in the sky as the earth rotates – which in many ways make it appear that the sky is circling around the earth.

I always think of Pink Floyd’s epic Learning to Fly when I think of night sky shots.
Into the distance, a ribbon of black
Stretched to the point of no turning back
A flight of fancy on a windswept field
Standing alone my senses reeled
A fatal attraction is holding me fast,
How can I escape this irresistible grasp?
Can’t keep my eyes from the circling skies
Tongue-tied and twisted, just an earth-bound misfit, I.
Anyway, with the set up for star trails, there were a few considerations. The first being how to set up the build-in intervalometer in the Nikon D300.
It’s far from clear and a quick search on the web you’ll see that there is so much confusion abut this most important step.
Next, pick a moonless, mosquitoless night. This is about the right time of year (no mosquitos is an anomaly here however) but nonetheless, darkness is early enough that you can still get a good night’s sleep, it’s warm enough that you won’t freeze to death, and it’s just a very pleasant way to spend the night.
Then plan your shots. For this first attempt at star trails my shooting was a bit off – that’s why you see dots instead of actual trails. You have o set your timeframe – 1 hour, 3 hours etc, choose your exposure time (30 seconds, 60 seconds…), your interval, and most important COMPOSE. My sample shot here is just that – a test. So it’s taken from my yard nothing attractive about it – especially the powerline! This lack of artistic vision is something I see in a lot of “spacial effects” shots, whether infrared or night sky or whatever. It seems the shooter forgets all the normal rules of photography and just concentrates on the special effect. I get it to a point – you must practice your technique till it becomes second nature. But the technique is NOT the shot.
For star trails for example, pick an interesting foreground, take 1 frame where you expose for the foreground, maybe use a coloured gel over your flash or do some light painting with a gel on your flashlight. Give your startrails a WOW setting and you will have a killer image! Make your startrails in your yard with powerlines everywhere and you have nothing but a test.
See the complete star trails guide here.
And because the clouds rolled into my star-trails sequence, I made it into a timelapse movie. Look at the stars around the edges and you can see them “rotate” about the North Star! The clouds are kind of a cool effect but not what I wanted. If you’re up for a star party at the end of September let me know – there are always amazing images that result from these.
Leave a Reply
You must be logged in to post a comment.